Basics of Graph Databases - Part 2
Table of Contents
This article is a continuation of Basics of Graph Databases (Part 1) which focused on an introduction to graph databases, Neo4j and the Cypher language.
Introduction
In this article we’re going to deploy and connect to an instance of Neo4j within Azure, write Cypher code to create our property graph from scratch, and figure out what we can determine by visually exploring the graph, as well as querying it using Cypher. The deployment on Azure is not meant to be “production ready”, but rather to provide us with a quick sandbox instance.
The model we’ll be creating will be fictional in nature and resemble some aspects you may find on LinkedIn. I’ll be adding the code snippet directly in this article so that you can copy/paste it in your Neo4j instance, should you choose to follow along.
Getting Started
Neo4j provides a number of different deployment options, such as a deploying an instance locally on your machine, leveraging a hosted instance from Neo4j (check out the Neo4j Sandbox for some additional fun), or deploying on a compute instance elsewhere. Just to stick with an Azure theme we’ll be deploying an instance from a Neo4j Azure Marketplace image.
To get rolling, we’ll navigate to the Azure portal and create a new resource. When you search for “Neo4j” you’ll likely get a result similar to this:

To find out which flavor is right for you I would recommend visiting the Neo4j licensing page to view the differences. One piece of information I will include here is the difference between a single instance and a “Causal Cluster”.
Causal Clusters are found in Neo4j’s Enterprise licensing model and essentially act as a redundant cluster better suited for production environments. They are comprised of two main tiers - the core cluster and the replica cluster. Think of the core cluster as the way to scale the transactional throughput (read/write) while still maintaining fault tolerance. The replica clusters are a scaled query/cache solution that will poll the core cluster and cache new graph data. This will support faster querying and the ability to scale compute power, but are not considered “critical” and can fail without impact to the core data.
Whew, moving on.
Deployment
At the most basic level, this is just like deploying any other VM. Pick the instance type/licensing model you want - I would recommend Community Edition, or they offer a free trial of Enterprise if you want to give it a test run. Fill in the fields as if you were deploying any other VM. Here’s a snippet for general settings if you find it useful:

Continue through the deployment pieces until you hit the Networking section. Make sure to add a Public IP address - after all, this isn’t production. ;) Neo4j has a frontend web UI that allows you to interact with the database. We’ll use this public IP/DNS name to connect to our instance. Once you’re all set clicking through the menus, create your virtual machine.

Once the virtual machine has been deployed, one thing we’ll do is navigate to the Network Security Group that was created with our VM. Make sure the following ports are on the “Inbound security rules” tab of the NSG, and if not make sure to add them.

To feel a bit better we’ll also make sure to change the allowed source IP address in each rule to our individual public IP.

Connecting
One the instance has been deployed and you have your inbound rules set, we can use either the public IP address or the DNS name to connect to the instance. You’ll also want to select which port (HTTP - 7474 or HTTPS - 7473) that you want to connect with. If you choose HTTPS be aware that you’ll be presented with a certificate error, as we haven’t installed an SSL cert.
Note: You’ll be able to find the public IP or DNS name on the main window of your Neo4j virtual machine resource in Azure. Enter this into the browser to connect, followed by the port you want to use. Example: neo4j-ahd.northcentralus.cloudapp.azure.com:7474
You’ll then be presented with a login prompt like the below. You’ll also see two connection types in the drop down box - neo4j:// and bolt://. We can use neo4j:// and specify a port after our IP address, or we can just switch to bolt:// which uses port 7687 by default. Either option works, but you’ll want to make sure you hit port 7687.
The default username and password with a new Neo4j instance is neo4j/neo4j. :) Use these to login for the first time. Feel free to change the password once you’ve logged in if you like.

Neo4j Quickstart
Once logged in you’ll see the following:

The fun thing about Neo4j is that everything is pretty well self-contained within the service itself. This includes some things like basic training, some example graphs you can load, ability to determine system information and performance, etc.
Neo4j operates by providing a command line at the top of the main screen and the output after submitting the code. Some quick commands (Windows) that will help you:
- Shift + Enter: drops to a new line in the code block
- Ctrl + Enter: Submits the query.
We’ll start off by using a simple query to make sure we have no data in our database.


As you can see, we have no records within the database and can jump into creating some.
Creating a Graph
As mentioned at the beginning of this article, we’ll be creating a fictional model against a platform similar to LinkedIn, where we’ll have connections and relationships between them. Neo4j’s documentation is great for determining the syntax and how to work with the platform, so we won’t be doing a deep dive here.
I’ve added a code snippet of a model I created for the use of this article. Feel free to copy/paste this whole block into the command line in Neo4j and submit.
// LI Users

CREATE (u1:User {name:'Ben Prescott', age:'32', phone:'312-566-3234', opentowork:'no', hiring:'yes'})
CREATE (u2:User {name:'Derek Jones', age:'32', phone:'312-426-3234', opentowork:'yes', hiring:'no'})
CREATE (u3:User {name:'Paul Jackson', age:'21', phone:'708-322-8712', opentowork:'no', hiring:'yes'})
CREATE (u4:User {name:'Trisha Peterson', age:'27', phone:'630-452-8756',opentowork:'no', hiring:'no'})
CREATE (u5:User {name:'Bill Gates', age:'65', phone:'312-314-7751',opentowork:'yes', hiring:'yes'})

// Articles

CREATE (a1:Article {name:'Basics of Graph Databases (Part 1)', category:'Technical'})
CREATE (a2:Article {name:'Univariate and Multivariate Linear Regression: Cancer Mortality Rates', category:'Technical'})
CREATE (a3:Article {name:'E-mail Sentiment Analysis Using Python and Microsoft Azure -- Part 2', category:'Technical'})
CREATE (a4:Article {name:'E-mail Sentiment Analysis Using Python and Microsoft Azure -- Part 1', category:'Technical'})
CREATE (a5:Article {name:'The Road Ahead after 25 years', category:'General'})
CREATE (a6:Article {name:'Bill Gates and Rashida Jones Ask Big Questions', category:'Interview'})

// Companies

CREATE (c1:Company {name:'AHEAD', location:'Chicago'})
CREATE (c2:Company {name:'Twitter', location:'Chicago'})
CREATE (c3:Company {name:'Microsoft', location:'Chicago'})

// Universities

CREATE (s1:School {name:'Northwestern University', location:'Chicago'})
CREATE (s2:School {name:'Massachusetts Intitute of Technology', location:'Cambridge'})
CREATE (s3:School {name:'University of Chicago', location:'Chicago'})
CREATE (s4:School {name:'Harvard University', location:'Cambridge'})

// WORKS_AT relationship

CREATE (u1)-[:WORKS_AT {job_title:'Azure Delivery Manager'}]->(c1)
CREATE (u3)-[:WORKS_AT {job_title:'Manager'}]->(c3)
CREATE (u4)-[:WORKS_AT {job_title:'Platform Developer'}]->(c2)
CREATE (u5)-[:WORKS_AT {job_title:'Azure Architect'}]->(c1)

// WROTE relationship

CREATE (u1)-[:WROTE {date:'11/30/2020'}]->(a1)
CREATE (u1)-[:WROTE {date:'09/14/2020'}]->(a2)
CREATE (u1)-[:WROTE {date:'06/11/2020'}]->(a3)
CREATE (u1)-[:WROTE {date:'05/08/2020'}]->(a4)
CREATE (u5)-[:WROTE {date:'11/24/2020'}]->(a5)
CREATE (u5)-[:WROTE {date:'11/30/2020'}]->(a6)

// FRIENDS_WITH relationship

CREATE (u1)-[:FRIENDS_WITH {relation:'Best Friend'}]->(u5)
CREATE (u2)-[:FRIENDS_WITH {relation:'Friend'}]->(u4)
CREATE (u3)-[:FRIENDS_WITH {relation:'Friend'}]->(u2)
CREATE (u4)-[:FRIENDS_WITH {relation:'Friend'}]->(u2)
CREATE (u5)-[:FRIENDS_WITH {relation:'Best Friend'}]->(u1)
CREATE (u5)-[:FRIENDS_WITH {relation:'Prior Coworker'}]->(u3)
CREATE (u2)-[:FRIENDS_WITH {relation:'Friend'}]->(u1)

// STUDIED_AT relationship

CREATE (u1)-[:STUDIED_AT {graduated: 'No', level: 'Masters'}]->(s1)
CREATE (u2)-[:STUDIED_AT {graduated: 'Yes', level: 'Bachelors'}]->(s3)
CREATE (u2)-[:STUDIED_AT {graduated: 'No', level: 'Masters'}]->(s4)
CREATE (u3)-[:STUDIED_AT {graduated: 'No', level: 'Associates'}]->(s2)
CREATE (u4)-[:STUDIED_AT {graduated: 'No', level: 'Bachelors'}]->(s3)
CREATE (u5)-[:STUDIED_AT {graduated: 'Yes', level: 'Bachelors'}]->(s4)

RETURN *
Once you submit the above code you should see the following output:

If so - congratulations! You’ve just created your first graph structure in Neo4j with some pretty easy to understand CREATE commands in Cypher. Now we can work with this as a very simple example of a small property graph.
Brief UI Overview
If we run the command MATCH (N) RETURN N we can see that it’ll now return all of our newly added added. In the above screenshot you’ll see the left side has different view options for the query result - Graph, Table, Text, Code.
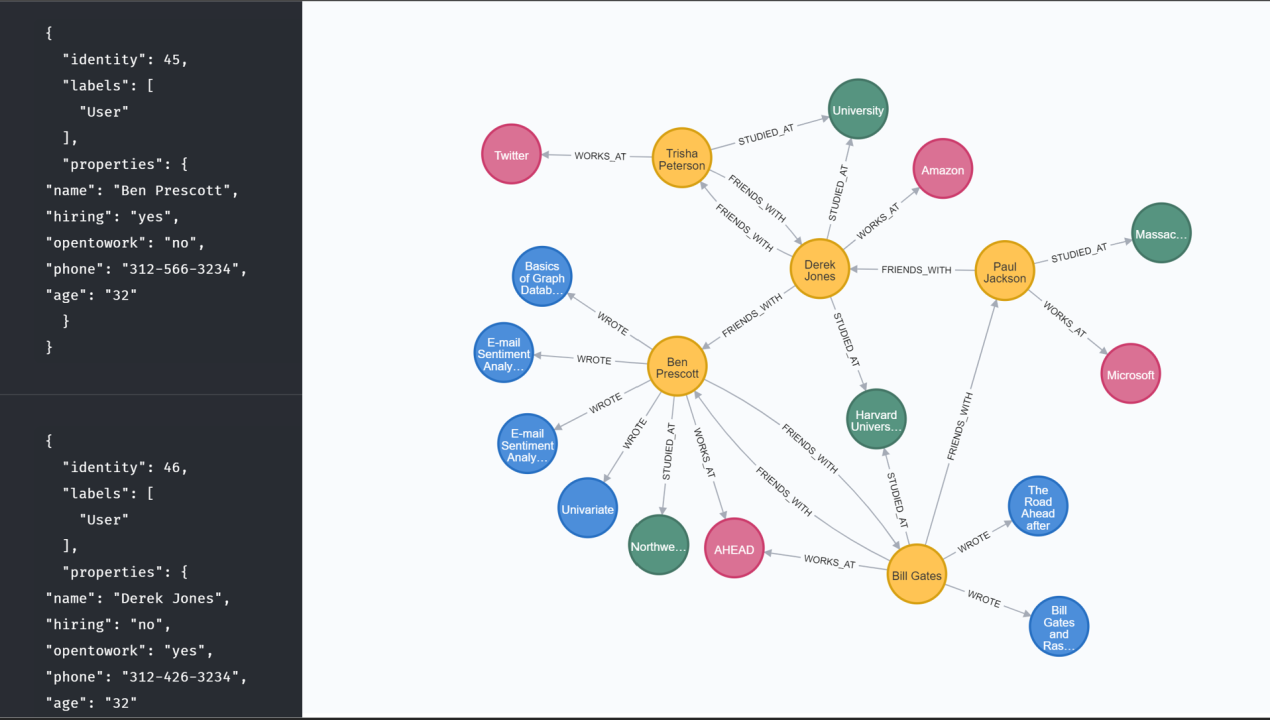
On the Table option you’ll see it actually returns the results in JSON format.

Text will return everything in comma-delimited text blocks.

Code will show the server information and the query details.

On the left side of the screen you’ll see three menus at the top left, and three at the bottom left. The top three represent database information (for one or multiple databases), created/saved scripts and queries, and help/documentation, respectively.
By selecting the database icon in the top left of the screen you can now see all of the fields available to you within your database. Things like node labels, relationships, individual properties, etc. are all seen here. You can also click each of those to have it query for you, and show you the resulting query so that you can reuse it. The Neo4j UI makes it nice and easy to get started.

Traversing the Graph
Now we’ll write some queries to help draw out information from our newly created graph. Let’s start by finding every person who is a friend with someone else.
MATCH (u:User)-[:FRIENDS_WITH]->()
RETURN u

At first glance it looks like I’m a friend with Bill Gates and he’s also a friend with me. It also looks like Derek Jones friended me but I didn’t friend him back. Same situation with Bill Gates and Paul Jackson. We can expand on our search to find people who are friends with someone and are also looking for work.
MATCH (u:User)-[:FRIENDS_WITH]->()

WHERE u.opentowork = 'yes'

RETURN u

Huh, interesting. Looks like Bill Gates is looking for work. Does he work somewhere right now?
MATCH (u:User)-[:FRIENDS_WITH]->()

WHERE u.opentowork = 'yes'

AND (u:User)-[:WORKS_AT]->()

RETURN u

Looks like Bill currently works somewhere and has his “opentowork” option set as “yes”. Lets find out more about Bill. We’ll modify our query a bit to be less specific on the node’s relationships and open it up to any relationship to anything.
MATCH p=(u:User {name: 'Bill Gates'})-[r]->(a)

RETURN *

Now we can see all of Bill’s relationships, including how he is friends with me and works at the same company as I do. If we look at the detailed information in the Table output we can see Bill’s job title. Looks like Bill works as an Azure Architect at AHEAD. We’ll also modify our query to pull my information now and compare.

MATCH p=(u:User {name: 'Ben Prescott'})-[r]->(a)
RETURN *

Looks like I’m an Azure Delivery Manager and Bill is an Azure Architect. Maybe I should have a chat with Bill. :)
Wrap-up
To do a quick recap, we’ve covered the following topics in this article:
- Deployment of a Neo4j instance on Microsoft Azure
- Connecting to the Neo4j instance
- Creating a new graph from scratch with Cypher CREATE commands
- Querying the graph to find relationships and useful information
Hopefully you found this article useful! There are more fun things to be found in our created graph, so I would suggest you continue to try some queries on your own.
As always, let me know if you have any comments, feedback or questions about anything.